-
[ISTIO] 1. 설치하기IT 발자취.../istio 2023. 6. 16. 02:08

https://istio.io/latest/docs/setup/getting-started/#download
Getting Started
Try Istio’s features quickly and easily.
istio.io
환경 : MacOS (M1)
대상 : AKS
Download Istio
1. Istio release 페이지에가서 OS에 맞는 파일을 다운받거나, 리눅스나 macOS 환경에서는 아래 명령어로 최근 버전을 다운 받고 압축 해제 가능
$ curl -L https://istio.io/downloadIstio | sh -2. Istio pakacge directory로 이동한다. 현재 문서는 1.18.0 버전을 사용한다.
$ cd istio-1.18.0설치 디렉토리엔 아래를 포함한다.
* 샘플 어플리케이션은 samples/
* istioctl 클라이언트 바이너리는 bin/ 디렉터리에 존재
istioctl 클라이언트를 path에 추가 (linux, macOS)
$ export PATH=$PWD/bin:$PATHInstall Isito
1. 설치를 위해서 우리는 demo configuration profile을 사용한다. 이는 테스트에 좋은 기본 셋을 포함한다. 하지만 프로덕션 환경 또는 성능 테스트를 위한 다른 프로파일들도 존재한다.
※ If your platform has a vendor-specific configuration profile, e.g., Openshift, use it in the following command, instead of the demo profile. Refer to your platform instructions for details.
$ istioctl install --set profile=demo -y
✔ Istio core installed
✔ Istiod installed
✔ Egress gateways installed
✔ Ingress gateways installed
✔ Installation complete
Making this installation the default for injection and validation.
2. 추후 애플리케이션을 배포할 때, 자동으로 Envoy 사이드카 프록시를 주입시켜주기 위해서 Istio에 지시하는 네임스페이스 레이블을 추가
$ kubectl label namespace default istio-injection=enabled
namespace/default labeled
Deploy the sample application
1. Sample application인 Bookinfo를 배포한다.
$ kubectl apply -f samples/bookinfo/platform/kube/bookinfo.yaml
service/details created
serviceaccount/bookinfo-details created
deployment.apps/details-v1 created
service/ratings created
serviceaccount/bookinfo-ratings created
deployment.apps/ratings-v1 created
service/reviews created
serviceaccount/bookinfo-reviews created
deployment.apps/reviews-v1 created
deployment.apps/reviews-v2 created
deployment.apps/reviews-v3 created
service/productpage created
serviceaccount/bookinfo-productpage created
deployment.apps/productpage-v1 created
2. 어플리케이션이 시작된다. 각 파드가 준비되면 Istio 사이드카는 함께 배포된다.
$ kubectl get services
NAME          TYPE        CLUSTER-IP     EXTERNAL-IP   PORT(S)    AGE
details       ClusterIP   10.0.132.130   <none>        9080/TCP   68s
kubernetes    ClusterIP   10.0.0.1       <none>        443/TCP    3d15h
productpage   ClusterIP   10.0.226.110   <none>        9080/TCP   68s
ratings       ClusterIP   10.0.244.175   <none>        9080/TCP   68s
reviews       ClusterIP   10.0.216.233   <none>        9080/TCP   68s
파드당 2개의 컨테이너가 동작하는 것을 확인할 수 있다.
$ kubectl get pods
NAME                             READY   STATUS    RESTARTS   AGE
details-v1-5ffd6b64f7-j6km5      2/2     Running   0          92s
productpage-v1-8b588bf6d-m22d2   2/2     Running   0          92s
ratings-v1-5f9699cfdf-h48mh      2/2     Running   0          92s
reviews-v1-569db879f5-tf2vc      2/2     Running   0          92s
reviews-v2-65c4dc6fdc-fzjsh      2/2     Running   0          92s
reviews-v3-c9c4fb987-xkqv9       2/2     Running   0          92s
3. 지금까지 정상동작한 것을 확인하기 위하여, 아래 명령으롤 통해서 앱이 클러스터 내부에서 동작하고 있고, 응답 값으로 HTML 페이지를 반환하는지 확인한다.
$ kubectl exec "$(kubectl get pod -l app=ratings -o jsonpath='{.items[0].metadata.name}')" -c ratings -- curl -sS productpage:9080/productpage | grep -o "<title>.*</title>"
<title>Simple Bookstore App</title>
Open the application to outside traffic
Bookinfo application이 배포되었지만 외부에서는 접근이 되지 않는 상태이다. 접근이 가능하게 하려면 메시의 엣지로 파우트해주는 경로를 매핑해주는 Istio Ingress Gateway를 생성한다.
1. Istio gateway와 어플리케이션을 연관 시킨다.
$ kubectl apply -f samples/bookinfo/networking/bookinfo-gateway.yaml
gateway.networking.istio.io/bookinfo-gateway created
virtualservice.networking.istio.io/bookinfo created
2. 이슈가 없는지 확인한다.
$ istioctl analyze
✔ No validation issues found when analyzing namespace: default.
Determining the ingress IP and ports
아래를 따라 게이트웨이에 접근하기 위한 INGRESS_HOST와 INGRESS_PORT 변수를 설정한다. 플랫폼에 맞게 설정한다.
현 문서는 AKS를 사용하기 때문에 가이드 문서에 적혀 있는 Other platforms를 따라한다. Minikube를 사용할 경우, 해당 문서를 따라하면 된다.
아래 명령어는 쿠버네티스 클러스터가 external 로드 밸런서를 제공하는지에 대해 알 수 있다.
$ kubectl get svc istio-ingressgateway -n istio-system
NAME                   TYPE           CLUSTER-IP       EXTERNAL-IP     PORT(S)                                      AGE
istio-ingressgateway   LoadBalancer   172.21.109.129   130.211.10.121  80:31380/TCP,443:31390/TCP,31400:31400/TCP   17h
만약 EXTERNAL-IP 값이 설정되어 있다면, 당신의 환경은 external 로드 밸런서가 존재하는 것이다. 만약 EXTERNAL_IP 값이 <none> 또는 <pending> 상태라면 ingress gateway를 위한 external 로드 밸런서를 지원하지 않는 것이다. 이 경우 gateway는 node port 를 사용해서 접근 가능하다.
이 문서는 external 로드 밸런서를 사용하는 환경이라고 가정한다.
ingress IP와 port를 지정한다.
export INGRESS_HOST=$(kubectl -n istio-system get service istio-ingressgateway -o jsonpath='{.status.loadBalancer.ingress[0].ip}')
export INGRESS_PORT=$(kubectl -n istio-system get service istio-ingressgateway -o jsonpath='{.spec.ports[?(@.name=="http2")].port}')
export SECURE_INGRESS_PORT=$(kubectl -n istio-system get service istio-ingressgateway -o jsonpath='{.spec.ports[?(@.name=="https")].port}')
특정 환경에서는 로드밸런서가 IP 대신 hostname를 반환하는 경우가있다. 이 경우 ingress gateway의 EXTERNAL-IP 값이 IP address가 아닐 수 있다. hostname을 반환하면 INGRES_HOST 환경 변수 값 설정에 실패 할 수 있다. 이경우 아래 명령어로 올바른 INGRESS_HOST 값을 지정해준다.
하지만 AKS에서는 IP값을 제대로 반환해 줘서 이 문서의 명령어는 필요하지 않았다.$export INGRESS_HOST=$(kubectl -n istio-system get service istio-ingressgateway -o jsonpath='{.status.loadBalancer.ingress[0].hostname}')GATEWAY_URL을 설정한다.
$ export GATEWAY_URL=$INGRESS_HOST:$INGRESS_PORTIP 주소와 포트가 잘 설정 되었는지 확인한다.
$ echo "$GATEWAY_URL"
20.200.224.236:80
외부 접근 확인
$ echo "http://$GATEWAY_URL/productpage"출력되는 url로 접근 확인
View the dashboard
Istio는 몇가지 다른 텔레메드리 어플리케이션과 통합된다. 이는 서비스 메시의 구조를 이해하고 메시의 토폴로지를 보여주고 메시의 상태를 분석하는데 도움을 준다.
Prometheus, Grafana 그리고 Jaeger와 함께 Kiali 대시보드를 배포해본다.
1. Kaili and the other addon을 설치한다.
$ kubectl apply -f samples/addons
serviceaccount/grafana created
configmap/grafana created
service/grafana created
deployment.apps/grafana created
configmap/istio-grafana-dashboards created
configmap/istio-services-grafana-dashboards created
deployment.apps/jaeger created
service/tracing created
service/zipkin created
service/jaeger-collector created
serviceaccount/kiali created
configmap/kiali created
clusterrole.rbac.authorization.k8s.io/kiali-viewer created
clusterrole.rbac.authorization.k8s.io/kiali created
clusterrolebinding.rbac.authorization.k8s.io/kiali created
role.rbac.authorization.k8s.io/kiali-controlplane created
rolebinding.rbac.authorization.k8s.io/kiali-controlplane created
service/kiali created
deployment.apps/kiali created
serviceaccount/loki created
configmap/loki created
configmap/loki-runtime created
service/loki-memberlist created
service/loki-headless created
service/loki created
statefulset.apps/loki created
serviceaccount/prometheus created
configmap/prometheus created
clusterrole.rbac.authorization.k8s.io/prometheus created
clusterrolebinding.rbac.authorization.k8s.io/prometheus created
service/prometheus created
deployment.apps/prometheus created
$ kubectl rollout status deployment/kiali -n istio-system
2. Kiali 대시보드에 접근한다.
$ istioctl dashboard kiali
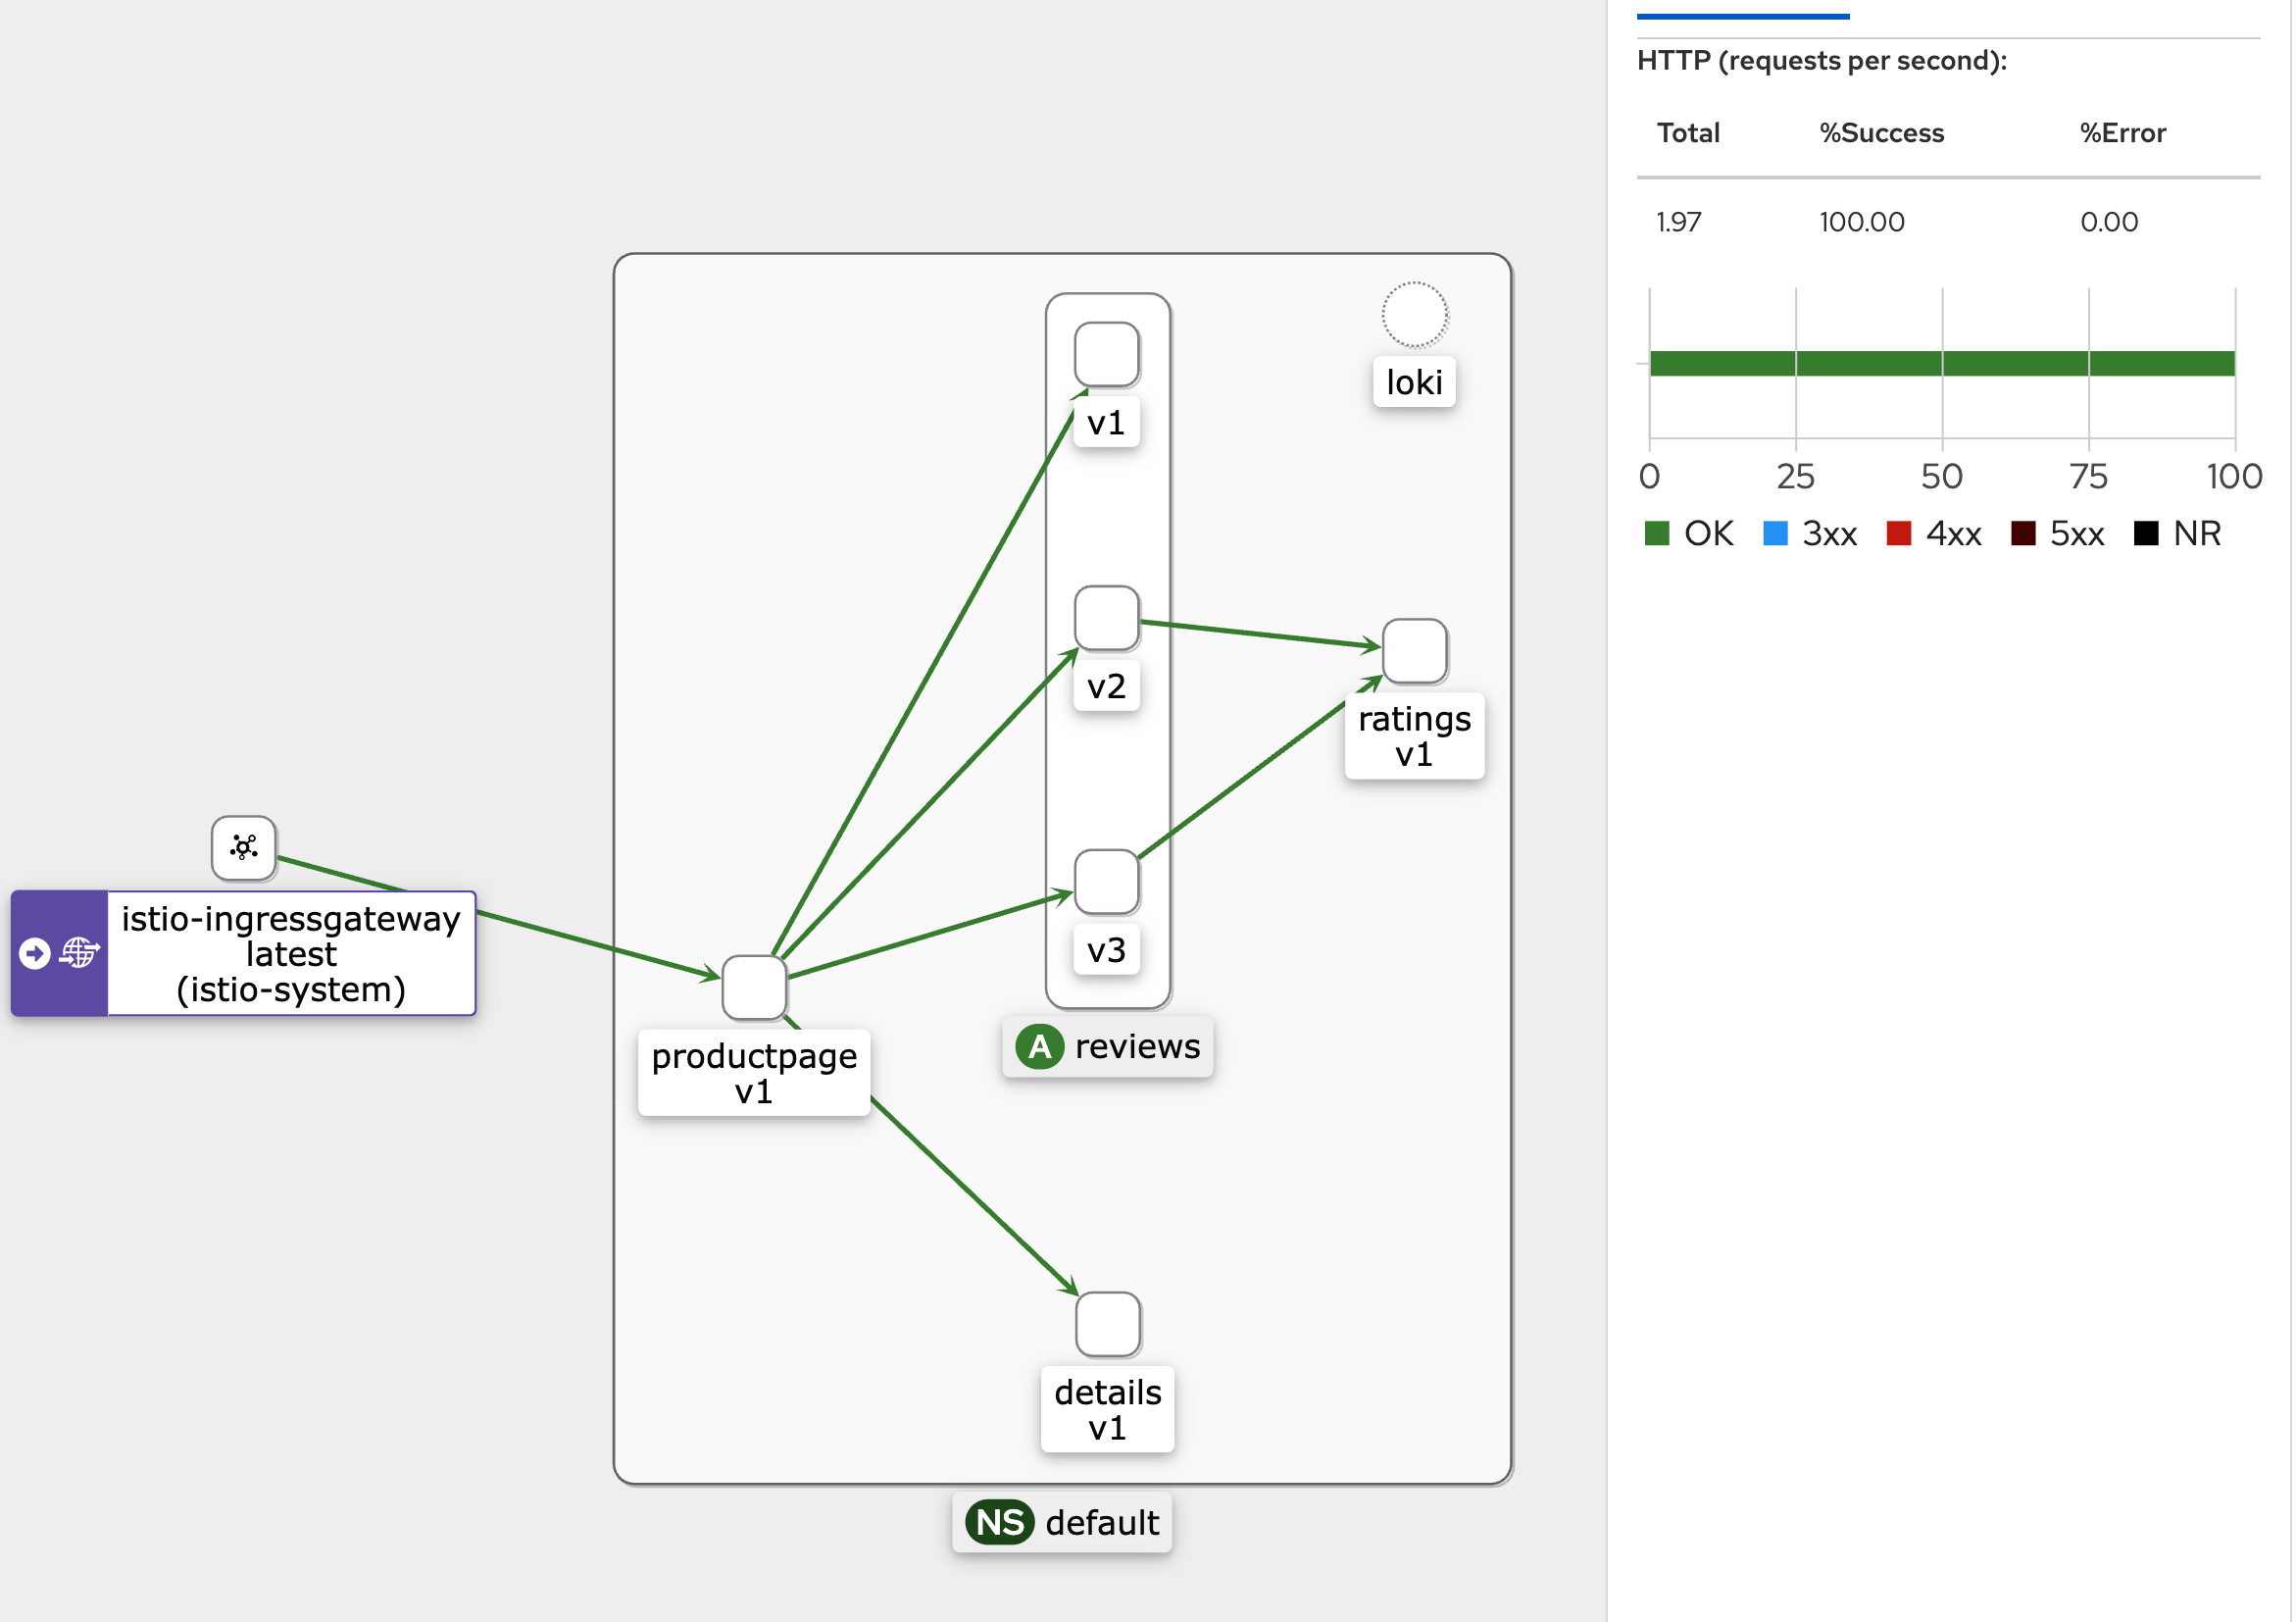
3. 왼쪽 메뉴에서 Graph를 선택하고, Namespace에서 default를 선택한다.
Trace 데이터를 보기 위해서는 서비스에 요청을 보내야한다. 요청수는 Istio의 샘플링률에 따라 알 수 있고, 이는 Telemetry API를 사용해서 설정된다. 기본 샘플릴률은 1%이고, 최소 100개의 요청을 보내야 첫번째 trace 가 보여진다. 100개의 요청을 productpage 서비스에 요청한다.
$ for i in $(seq 1 100); do curl -s -o /dev/null "http://$GATEWAY_URL/productpage"; doneKiali 대시보드는 Bookinfo 샘플 어플리케이션에 있는 서비스들관의 연관관계를 보여준다. traffic flow를 시각화해준다.
Uninstall
To delete the Bookinfo sample application and its configuration, see Bookinfo cleanup.
The Istio uninstall deletes the RBAC permissions and all resources hierarchically under the istio-system namespace. It is safe to ignore errors for non-existent resources because they may have been deleted hierarchically.
$ kubectl delete -f samples/addons
$ istioctl uninstall -y --purge
The istio-system namespace is not removed by default. If no longer needed, use the following command to remove it:
$ kubectl delete namespace istio-systemThe label to instruct Istio to automatically inject Envoy sidecar proxies is not removed by default. If no longer needed, use the following command to remove it:
$ kubectl label namespace default istio-injection-댓글